vcenter

Upgrading vCenter Server Appliance 5.5 to 6.0 using CLI
In 6.0 the standard installation and upgrade of the vCenter Server Appliance has changed to an ISO which you can mount in Windows. This ISO provides a web interface. This interfaces asks you to install the Client Integration Plugin 6.0, after which you can use the web interface to install or upgrade your vCenter Server Appliance.
Of course, this gives us Unix users another hurdle to overcome with installing the vSphere environment. Also, the Client Integration Plugin has some issues working with the latest versions of Chrome and Firefox. Lastly, hardly anybody likes using a web interface for this kind of installations.
Luckily, VMware has been kind enough to provide us with a CLI installer as well! I’ve seen a couple of blog posts about using the CLI installer to install a new VCSA, but not as much about upgrading an existing VCSA. So i decided to do a little write-up providing some examples.
Overview of the upgrade
The tool will use a json template file containing all the information to perform the upgrade. It uses the information to first deploy a new VCSA VM on a target host. This new VCSA VM is provisioned with a temporary network. It will then migrate all the data from the existing VCSA to the new one. Once this is done, it will shut down the existing VCSA and reconfigure the network on the new VCSA to take all the settings from the old VCSA.
JSON template
Below is an example of a JSON template file that can be used to upgrade a 5.5 VCSA to a 6.0 VCSA. There are more templates inside the ISO (folder vcsa-cli-installer/templates) which you can use, but i’ve noticed some issues with these templates missing important sections.
|
1 2 3 4 5 6 7 8 9 10 11 12 13 14 15 16 17 18 19 20 21 22 23 24 25 26 27 28 29 30 31 32 33 34 35 36 37 38 39 40 41 42 43 44 45 46 47 48 49 |
{ "__version": "1.0", "__comments": "Sample template to upgrade a vCenter Server with an embedded Platform Services Controller from 5.5 to 6.0.", "source.vc": { "esx": { "hostname": "<IP of ESXi with current vCenter on>", "username": "root", "password": "vmware" }, "vc.vcsa": { "hostname": "<IP of current vCenter", "password": "vmware", "root.password": "vmware" } }, "target.vcsa": { "appliance": { "deployment.network": "<Name of your Management network Port group on your target ESXi>", "deployment.option": "<tiny|small|medium|large>", "name": "<VM name, this has to be different from the current vCenter VM>", "thin.disk.mode": true }, "os": { "ssh.enable": true }, "sso": { "site-name": "First-Default-Site" }, "temporary.network": { "hostname": "<Temporary hostname, does not have to be DNS resolvable>", "dns.servers": [ "<First DNS server IP>", "<Second DNS server IP>" ], "gateway": "<Gateway IP>", "ip": "<Temporary IP for migration>", "ip.family": "ipv4", "mode": "static", "prefix": "<network prefix, for instance: 24>" }, "esx": { "hostname": "<IP of ESXi to which the new VCSA should be placed on>", "username": "root", "password": "vmware", "datastore": "<The datastore name inside the target ESXi where to store the VCSA VM>" } } } |
Of course I kept some values to the default, but i’m sure you can figure out what to change where. There are a couple of important mentions I would like to mention:
- username and password in your source.vc > vc.vcsa section have to be the SSO administrator user and password (default user = [email protected], default pass = vmware)
- target.vcsa > appliance > name value is the name the VM will get, this has to be unique in your environment, so it can not be the same as your current VCSA, it has no impact on the hostname
- target.vcsa > sso > site-name value is just for your SSO, it has to be filled in, but just do something simple (‘First-Default-Site’ should be fine)
- target.vcsa > temporary.network: This is just temporary for during the upgrade/migration. After the migration, all the network sections are taken from the old VCSA.
- target.vcsa > esx : This is the info of the ESXi where you want to place the new VCSA VM, can be the same as the source, can be a different one. Just make sure the info is correct (if confused with the POD43 file: my local datastores have been named the same as the ESXi IP, to easily differentiate.)
Running the CLI installer
I will run this installer directly from the ISO mounted on /mnt/vcsa on a Linux machine.
I would first suggest to do a dry run, you can do so with the following command:
|
1 |
/mnt/vcsa/vcsa-cli-installer/lin64/vcsa-deploy upgrade --verify-only --accept-eula --no-esx-ssl-verify vcsa-upgrade-template.json |
This command will verify the configuration and all the connectivity. It will return a list of warnings and errors. Some of the more common warnings and errors you might encounter:
- Warnings about Postgresql password that will be the same as the root password of the new VCSA, this can be safely ignored.
- Warnings about port 22, this can also be safely ignored, just make sure the old and new VCSA’s can communicate through SSH
- Errors about SSO and certificates: This will prevent any upgrade, so this is something you will have to look at. Most of the time it’s an indication that your certificates were generated with a different hostname or IP than currently used. You can rectify this by going to the 5.5 VCSA’s administration web interface check that the hostname, IP and DNS settings are all correct and regenerate the certificates if needed (this requires a reboot).
After you fixed any errors, you can run the command without the --verify-only option:
|
1 |
/mnt/vcsa/vcsa-cli-installer/lin64/vcsa-deploy upgrade --accept-eula --no-esx-ssl-verify vcsa-upgrade-template.json |
This will start the upgrade and migration, just follow along with what is happening, you get some good info on the progress. It can take a while to finish (half an hour to an hour, easily. If you have a slow connection between the machine you are running the command and the appliances & esxi’s, it might take longer for the data transfers)
vCenter 5.5 Server Appliance quirks
Last week I upgraded my whole vSphere 5.1 environment to 5.5 and migrated to the vCenter 5.5 Server Appliance (VSA). Overall, I’m happy with this migration as the appliance gives me everything i need and the new web client works amazingly well, both with Mac OS X and Windows.
But there are a few quirks and small issues with it. Nothing to serious, and as i understand it, the VMware engineers are looking into it, but for those who are experiencing these issues, I wanted to provide a bit of explanation on how to fix them.
Quick stats on hostname is not up to date
![]()
The first issue I noticed, was a message that kept appearing in the web client when I was looking at the summary of my hosts. At first I thought that there was a DNS or connection issue, but i was capable of managing my hosts, so that was all good.
Starting to investigate the issue on internet, I noticed a few people reporting this issue, and apparently VMware already posted a KB article (KB 2061008) on it.
Let’s go to the simple steps on how to fix this on the VSA:
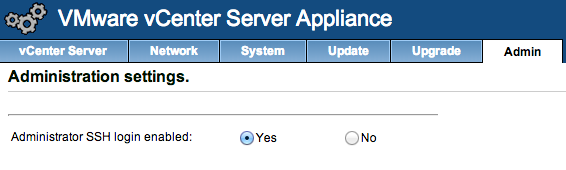
- Make sure SSH is enabled in your VSA admin panel:
- SSH to the VSA with user root and use the root password from the admin panel
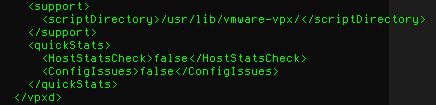
- Copy the /etc/vmware-vpx/vpxd.cfg file to a save location, you will keep this as a backup
- Open the /etc/vmware-vpx/vpxd.cfg file with an editor
- Locate the </vpxd> tag
- Add the following text above that tag:
1234<quickStats><HostStatsCheck>false</HostStatsCheck><ConfigIssues>false</ConfigIssues></quickStats> - It should more or less look like this:
- Save the file
- Restart your VSA, the easiest way is just to reboot it using the admin panel, or using the reboot command.
If you ever update the VSA, check the release notes, if this bug is fixed, you might want to remove these config values again.
Unable to connect to HTML5 VM Console
After a reboot of my VSA, I was unable to open the HTML5 VM Console from the web client. I got “Could not connect to x.x.x.x:7331”, the service seemed down. VMware is aware of this issue and a KB article (KB 2060604) is available.
The cause of this issue is a missing environment variable (VMWARE_JAVA_HOME). To make VSA aware of this variable, you can follow these steps:
- Make sure SSH is enabled in your VSA admin panel (see screenshot in step 1 of the issue above)
- SSH to the VSA with user root and the root password from the admin panel
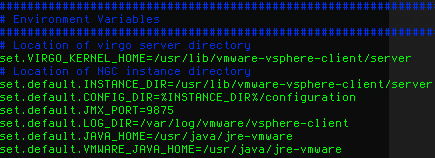
- Open the /usr/lib/vmware-vsphere-client/server/wrapper/conf/wrapper.conf file with an editor
- Locate the Environment Variables part
- Add the following text to the list of environment variables:
1set.default.VMWARE_JAVA_HOME=/usr/java/jre-vmware - It should look more or less like this:
- Save the file
- Restart the vSphere Web client using:
1/etc/init.d/vsphere-client restart
That should fix the issue and the HTML5 VM Console should work fine!
Migrate vCenter 5.1 Standard to vCenter 5.5 Server Appliance with Distributed vSwitch and Update Manager
At VMworld San Fransisco, VMware announced vSphere 5.5 and they officially released it a couple of days ago. With this new version of vSphere, the vCenter Server Appliance has been updated as well.
With this new version, the maximums have been increased. The vCenter Server Appliance was only usable in small environments with a maximum of 5 hosts and a 50 VM’s with the internal database. If you had more hosts and/or VMs, you had to connect your vCenter to an Oracle database. (Thanks Bert for noting this)
As of version 5.5, these limitations have been changed to a 100 hosts and 3000 VMs. With this change, vCenter Server Appliance becomes a viable alternative to a full fledged install on a Windows Server.
Until now I have always used vCenter as a full fledged install on Windows Server, with an SQL Server in my home lab. I used this setup to get a feel for running, maintaining and upgrading vCenter and all it’s components, while using multiple windows servers in a test domain. But with this new release, I’ve decided to migrate to the appliance and do a semi-fresh install.
I say semi-fresh, as I will migrate a few settings to this new vCenter server. Most settings will be handled manually or through the hosts, but the Distributed vSwitch are a bit more complicated. So I wanted to write down the steps I used to migrate from my standard setup to the appliance.
1. Export DvSwitch
You can export your DvSwitch using the web client with a few easy steps.
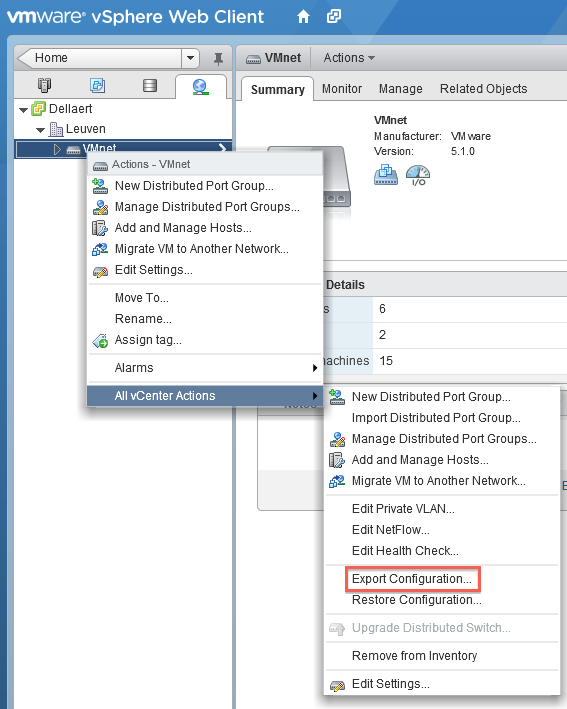
Go to the Distributed vSwitch you want to migrate and right click it, go to All vCenter actions and select Export Configuration. Make sure you export all port groups and save the file to a convenient location.
2. Create a cluster in the new vCenter Server Appliance
Make sure the cluster has the same settings as the one in the old vCenter server. Focus on the EVC settings, the rest can be as you choose, but this is rather important if you are migrating live hosts and VMs.
3. Disable High Availability on the cluster
As you need to move hosts away from the cluster, you will have to disable the High Availability on it.
4. Disconnect the hosts from the old vCenter server and connect them to the new vCenter Server Appliance
At this point, you need to disconnect the hosts from the old vCenter server and connect them to the new vCenter Server Appliance. This might take a while, so be patient and watch the progress.
Your hosts might show a warning indicating an issue, but this can be safely ignored as it will be solved after the import of the Distributed vSwitch
5. Import the Distributed vSwitch into the new vCenter Appliance Server
Go to the network tab and right click on the cluster, go to All vCenter actions and select Import Distributed Switch.
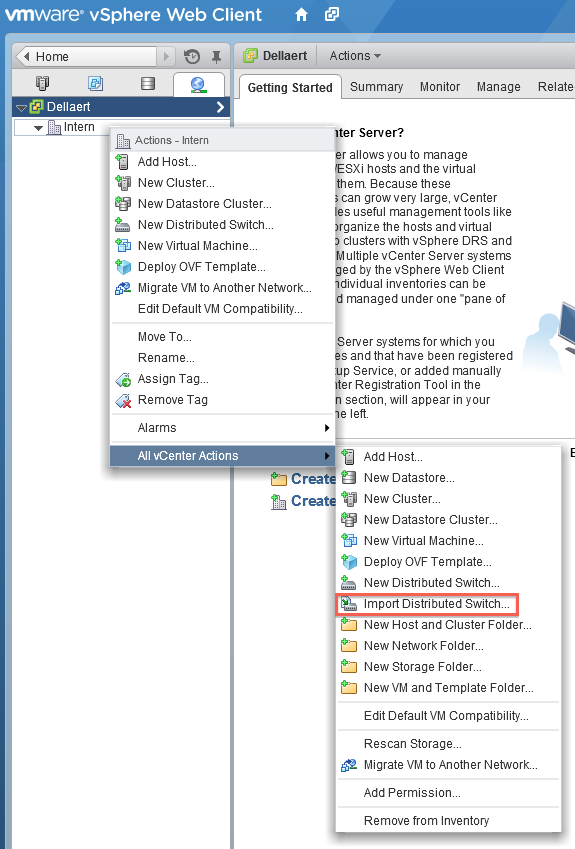
Make sure you select the ‘Preserve original distributed switch and port group identifiers’.
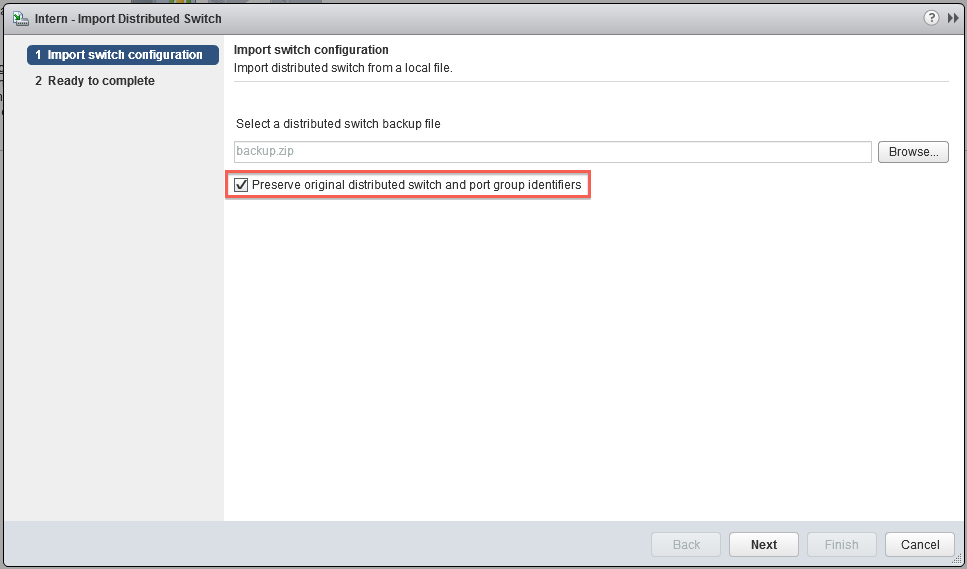
Give it a bit of time and your hosts will recognise the switch, and everything will be synced and connected again.
6. Update manager
There is one small issue with the great vCenter Server Appliance, it does lack an Update Manager in it’s regular setup. Luckily, you can connect a standard Update Manager install to the vCenter Server Appliance. I would suggest you just follow the standard guide. This one is still for vSphere 5.1, but the 5.5 version hasn’t changed much, so it should be pretty straightforward.
*update* Added extra information on the limitation of vCenter Server Appliance 5.1 (Oracle DB possibility)