vmware

multi-clone.py: Multi-threaded cloning of a template to multiple VMs
In december, VMware released pyVmomi, a Python SDK for the vSphere API. In the past I have created a script to clone virtual machines using pySphere. This script has helped me (and others, if the mails I received were any indication), but i haven’t updated or improved it in a while.
So I decided this was a good moment to revisit the script and recreate it completely using pyVmomi. And not just recreate it, but improve a lot on it as well. The result is an all new multi-clone.py script which allows for the following list of capabilities:
- Deploy a specified amount of virtual machines
- Deploy in a specified folder
- Deploy in a specified resource pool
- Specify if the cloned virtual machines need to be powered on
- Print out information of the main network interface (mac and ip, either IPv4 or IPv6)
- Run a post-processing script with 3 parameters (virtual machine name, mac and ip)
- Print logging to a log file or stdout
- Do this in a threaded way
Threads
The previous version only allowed a sequential way of working, which meant the clone task had to complete, network information gathered and post-processing finished before the next deployment could start. Combined with pySphere, which could be rather slow in gathering information, made the old script slow and sluggish.
Using pyVmomi improved the speed of the script from the start, it’s a lot quicker in gathering information and executing commands. By adding the possibility to use threads, the speed is improved even more, altho this will depend on the IOPS of your datastore.
If the you specify the amount of threads, both the creation of the virtual machines and gathering the mac and ip information are threaded separately. To explain how this works, an example works best:
Imagine you want to create 4 virtual machines from a template and you specify the amount of threads to 2. At start, two clone tasks will start at about the same time. When a clone task is done, another is started. While this third clone task is started in a new thread (to replace the thread that finished), a first information gathering (mac,ip) and post-processing thread is started for the clone task that has finished. This all runs at the same time, so at this point two clone tasks are running, each in a thread, and one information gathering and post-processing thread is running. Once the second clone task is finished, two clone tasks threads are running and two information gathering and post-processing threads are running. If the two information gathering and post-processing threads aren’t finished when the two final clone tasks finish, two new information gathering and post-processing threads are put in the queue, but not started as only two threads can be running in that pool.
Deciding how many threads is the best for your case, will require a bit of experimenting and greatly depends on the IOPS of your datastore. The clone tasks takes the most time because it needs to copy the virtual disks to the newly created virtual machine.
Remember that vCenter, by default, will place any clone tasks in queue if more than 8 are started. So setting the amount of threads above 8 won’t really help, altho you are always able to do so.
Usage
Here is the output of the -h option, which provides an overview of the possible arguments and what they do:
|
1 2 3 4 5 6 7 8 9 10 11 12 13 14 15 16 17 18 19 20 21 22 23 24 25 26 27 28 29 30 31 32 33 34 35 36 37 38 39 40 41 42 43 44 45 46 47 48 49 50 51 52 53 54 55 56 57 58 59 |
usage: multi-clone.py [-h] [-6] -b BASENAME [-c COUNT] [-d] [-f FOLDER] -H HOST [-i] [-m] [-l LOGFILE] [-n AMOUNT] [-o PORT] [-p PASSWORD] [-P] [-r RESOURCE_POOL] [-s POST_SCRIPT] -t TEMPLATE [-T THREADS] -u USERNAME [-v] [-w MAXWAIT] Deploy a template into multiple VM's. You can get information returned with the name of the virtual machine created and it's main mac and ip address. Either in IPv4 or IPv6 format. You can specify which folder and/or resource pool the clone should be placed in. Verbose and debug output can either be send to stdout, or saved to a log file. A post-script can be specified for post-processing. And it can all be done in a number of parallel threads you specify. optional arguments: -h, --help show this help message and exit -6, --six Get IPv6 address for VMs instead of IPv4 -b BASENAME, --basename BASENAME Basename of the newly deployed VMs -c COUNT, --count COUNT Starting count, the name of the first VM deployed will be <basename>-<count>, the second will be <basename>-<count+1> (default = 1) -d, --debug Enable debug output -f FOLDER, --folder FOLDER The folder in which the new VMs should reside (default = same folder as source virtual machine) -H HOST, --host HOST The vCenter or ESXi host to connect to -i, --print-ips Enable IP output -m, --print-macs Enable MAC output -l LOGFILE, --log-file LOGFILE File to log to (default = stdout) -n AMOUNT, --number AMOUNT Amount of VMs to deploy (default = 1) -o PORT, --port PORT Server port to connect to (default = 443) -p PASSWORD, --password PASSWORD The password with which to connect to the host. If not specified, the user is prompted at runtime for a password -P, --disable-power-on Disable power on of cloned VMs -r RESOURCE_POOL, --resource-pool RESOURCE_POOL The resource pool in which the new VMs should reside, (default = Resources, the root resource pool) -s POST_SCRIPT, --post-script POST_SCRIPT Script to be called after each VM is created and booted. Arguments passed: name mac-address ip-address -t TEMPLATE, --template TEMPLATE Template to deploy -T THREADS, --threads THREADS Amount of threads to use. Choose the amount of threads with the speed of your datastore in mind, each thread starts the creation of a virtual machine. (default = 1) -u USERNAME, --user USERNAME The username with which to connect to the host -v, --verbose Enable verbose output -w MAXWAIT, --wait-max MAXWAIT Maximum amount of seconds to wait when gathering information (default = 120) |
Issues and feature requests
Feel free to use the Github issue tracker of the repository to post issues and feature requests.
Documentation
You can find all the documentation on GitHub.
multi-clone.py minimal user permissions
Half a year ago, I posted about a Python script I created using PySphere, called multi-clone.py. I used this script to quickly deploy multiple vm’s from the same template and do some post-processing. This allowed me to easily setup a lab environment to test any sort of cluster tool, configuration management tool, …
This tool has been picked up by some other people. I’m happy to see my work is useful to others. This also meant that I got the occasional question about it.
Last week someone came to me with an issue, he got strange error messages. At first I thought it might have been a version mismatch as the original script was developed using PySphere 0.1.7, and he was using PySphere 0.1.8. After a quick update on my end and testing it with PySphere 0.1.8, everything worked fine. I had the same vSphere version, the same PySphere version and I did the same command as he did. Sadly, I couldn’t reproduce the error.
At this point, all I could think of was a permissions error. So we tested if the user could create a template with the exact same information, using the web-client. It seemed he couldn’t.
All this got me thinking about the minimal security permissions a user needed to run my script in a vSphere environment. So I tested a few permission setups and came up with a minimal permissions list. I added this to the Github repository readme file, but decided to post it here as well.
All permissions are only necessary on their appropriate item. For instance: datastore permissions are only necessary for the datastores on which the template and VMs will be located (or cluster if a Storage DRS cluster), so you can limit access to only a certain set of datastores.
Minimal permissions necessary to run multi-clone.py and all it’s features
- Datastore
- Allocate space
- Network
- Assign Network
- Resource
- Apply recommendation
- Assign virtual machine to resource pool
- Scheduled task
- Create tasks
- Run task
- Virtual Machine
- Configuration
- Add new disk
- Interaction
- Power on
- Inventory
- Create from existing
- Provisioning
- Clone virtual machine (*)
- Deploy from template
- Configuration
(*) This is in case you want to use the script to clone an actual VM instead of a VM template

vCenter 5.5 Server Appliance quirks
Last week I upgraded my whole vSphere 5.1 environment to 5.5 and migrated to the vCenter 5.5 Server Appliance (VSA). Overall, I’m happy with this migration as the appliance gives me everything i need and the new web client works amazingly well, both with Mac OS X and Windows.
But there are a few quirks and small issues with it. Nothing to serious, and as i understand it, the VMware engineers are looking into it, but for those who are experiencing these issues, I wanted to provide a bit of explanation on how to fix them.
Quick stats on hostname is not up to date
![]()
The first issue I noticed, was a message that kept appearing in the web client when I was looking at the summary of my hosts. At first I thought that there was a DNS or connection issue, but i was capable of managing my hosts, so that was all good.
Starting to investigate the issue on internet, I noticed a few people reporting this issue, and apparently VMware already posted a KB article (KB 2061008) on it.
Let’s go to the simple steps on how to fix this on the VSA:
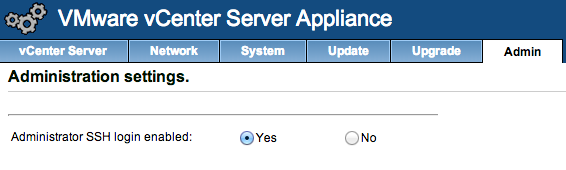
- Make sure SSH is enabled in your VSA admin panel:
- SSH to the VSA with user root and use the root password from the admin panel
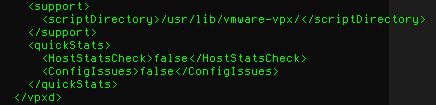
- Copy the /etc/vmware-vpx/vpxd.cfg file to a save location, you will keep this as a backup
- Open the /etc/vmware-vpx/vpxd.cfg file with an editor
- Locate the </vpxd> tag
- Add the following text above that tag:
1234<quickStats><HostStatsCheck>false</HostStatsCheck><ConfigIssues>false</ConfigIssues></quickStats> - It should more or less look like this:
- Save the file
- Restart your VSA, the easiest way is just to reboot it using the admin panel, or using the reboot command.
If you ever update the VSA, check the release notes, if this bug is fixed, you might want to remove these config values again.
Unable to connect to HTML5 VM Console
After a reboot of my VSA, I was unable to open the HTML5 VM Console from the web client. I got “Could not connect to x.x.x.x:7331”, the service seemed down. VMware is aware of this issue and a KB article (KB 2060604) is available.
The cause of this issue is a missing environment variable (VMWARE_JAVA_HOME). To make VSA aware of this variable, you can follow these steps:
- Make sure SSH is enabled in your VSA admin panel (see screenshot in step 1 of the issue above)
- SSH to the VSA with user root and the root password from the admin panel
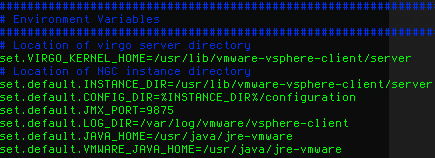
- Open the /usr/lib/vmware-vsphere-client/server/wrapper/conf/wrapper.conf file with an editor
- Locate the Environment Variables part
- Add the following text to the list of environment variables:
1set.default.VMWARE_JAVA_HOME=/usr/java/jre-vmware - It should look more or less like this:
- Save the file
- Restart the vSphere Web client using:
1/etc/init.d/vsphere-client restart
That should fix the issue and the HTML5 VM Console should work fine!
Migrate vCenter 5.1 Standard to vCenter 5.5 Server Appliance with Distributed vSwitch and Update Manager
At VMworld San Fransisco, VMware announced vSphere 5.5 and they officially released it a couple of days ago. With this new version of vSphere, the vCenter Server Appliance has been updated as well.
With this new version, the maximums have been increased. The vCenter Server Appliance was only usable in small environments with a maximum of 5 hosts and a 50 VM’s with the internal database. If you had more hosts and/or VMs, you had to connect your vCenter to an Oracle database. (Thanks Bert for noting this)
As of version 5.5, these limitations have been changed to a 100 hosts and 3000 VMs. With this change, vCenter Server Appliance becomes a viable alternative to a full fledged install on a Windows Server.
Until now I have always used vCenter as a full fledged install on Windows Server, with an SQL Server in my home lab. I used this setup to get a feel for running, maintaining and upgrading vCenter and all it’s components, while using multiple windows servers in a test domain. But with this new release, I’ve decided to migrate to the appliance and do a semi-fresh install.
I say semi-fresh, as I will migrate a few settings to this new vCenter server. Most settings will be handled manually or through the hosts, but the Distributed vSwitch are a bit more complicated. So I wanted to write down the steps I used to migrate from my standard setup to the appliance.
1. Export DvSwitch
You can export your DvSwitch using the web client with a few easy steps.
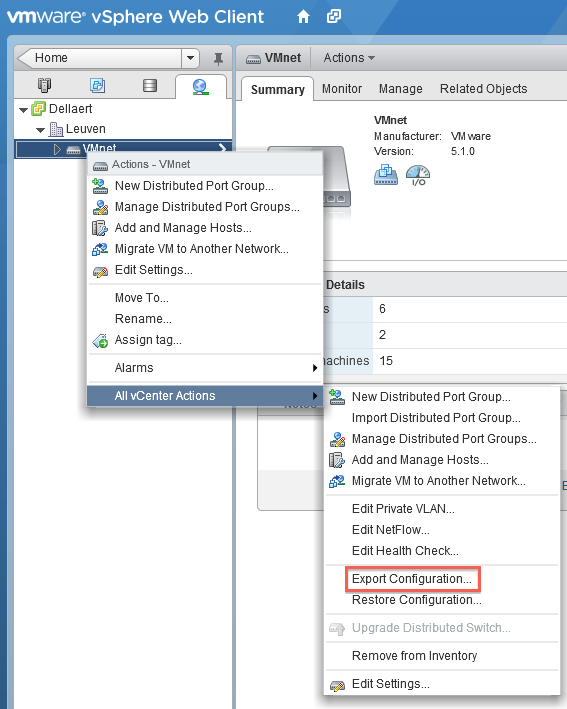
Go to the Distributed vSwitch you want to migrate and right click it, go to All vCenter actions and select Export Configuration. Make sure you export all port groups and save the file to a convenient location.
2. Create a cluster in the new vCenter Server Appliance
Make sure the cluster has the same settings as the one in the old vCenter server. Focus on the EVC settings, the rest can be as you choose, but this is rather important if you are migrating live hosts and VMs.
3. Disable High Availability on the cluster
As you need to move hosts away from the cluster, you will have to disable the High Availability on it.
4. Disconnect the hosts from the old vCenter server and connect them to the new vCenter Server Appliance
At this point, you need to disconnect the hosts from the old vCenter server and connect them to the new vCenter Server Appliance. This might take a while, so be patient and watch the progress.
Your hosts might show a warning indicating an issue, but this can be safely ignored as it will be solved after the import of the Distributed vSwitch
5. Import the Distributed vSwitch into the new vCenter Appliance Server
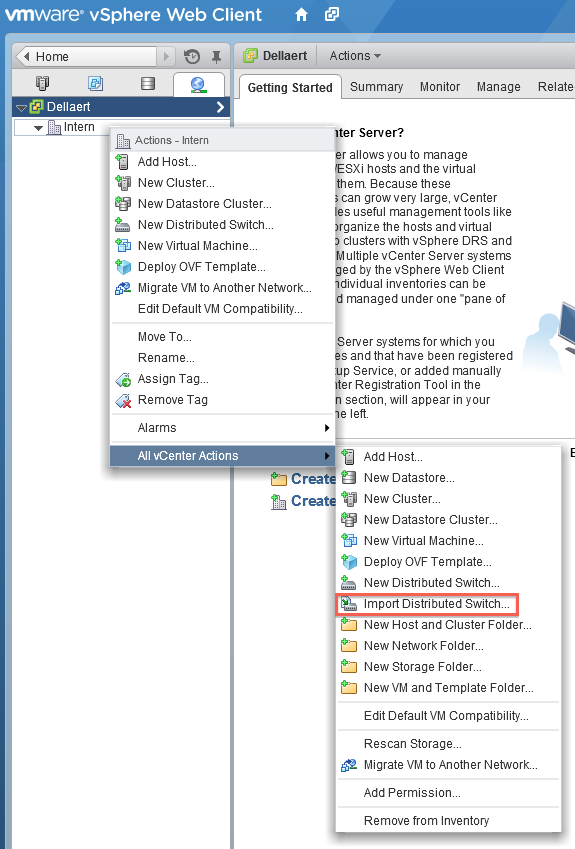
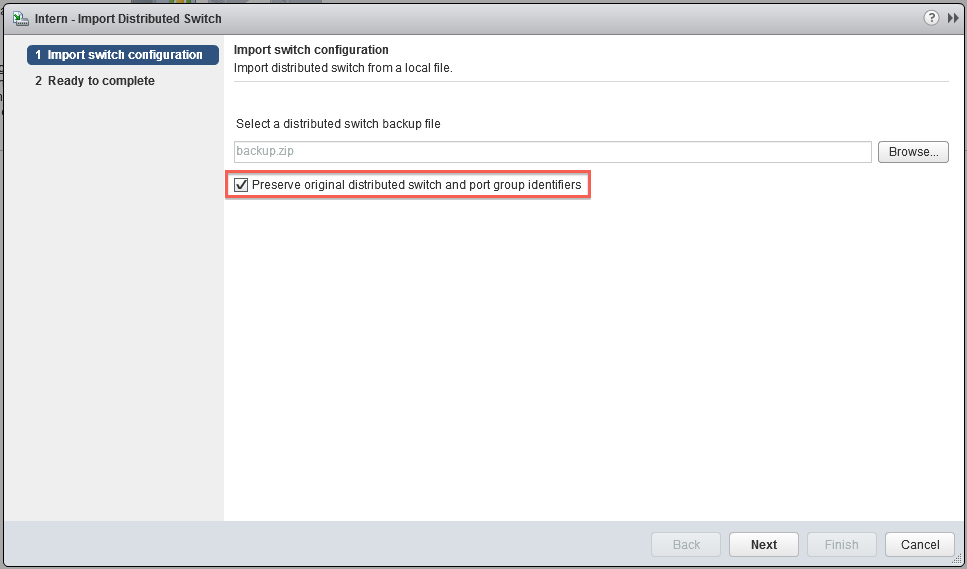
Go to the network tab and right click on the cluster, go to All vCenter actions and select Import Distributed Switch.
Make sure you select the ‘Preserve original distributed switch and port group identifiers’.
Give it a bit of time and your hosts will recognise the switch, and everything will be synced and connected again.
6. Update manager
There is one small issue with the great vCenter Server Appliance, it does lack an Update Manager in it’s regular setup. Luckily, you can connect a standard Update Manager install to the vCenter Server Appliance. I would suggest you just follow the standard guide. This one is still for vSphere 5.1, but the 5.5 version hasn’t changed much, so it should be pretty straightforward.
*update* Added extra information on the limitation of vCenter Server Appliance 5.1 (Oracle DB possibility)
PySphere script to clone a template into multiple VMs with post processing
*There is a better/newer version of this script, for more details, check this post: https://dellaert.org/2014/02/03/multi-clone-py-multi-threaded-cloning-of-a-template-to-multiple-vms/ – Or via github: https://github.com/pdellaert/vSphere-Python *
For an internal test setup i needed to be able to deploy multiple VMs from a template without to much hassle. So i started thinking that the best way to approach this, would be using a script. At first i thought i had to do this using PowerCLI as this is the preferred VMware way of scripting.
Luckily i came across the wonderful site of PySphere, which is a Python library that provides tools to access and administer a VMware vSphere setup. As Python wasn’t my strong suite, i was in a bit of a dilemma, i had almost no experience with either of those languages, so which to go for. Altho PowerCLI/Powershell has a lot more possibilities, as it is maintained and developed by VMware itself, Python had the great advantage i could do it all in a more familiar environment (Linux). It’s also closer to the languages i know than Powershell is. So i decided to just go for Python and see if it got me where i wanted to go.
This script deploys multiple VMs from a single template, you can specify how many and what basename the VMs should have. Each VM gets a name starting with the basename and a number which increments with each new VM. You are able to specify at what number it should start. You can also specify in which resource pool the VMs should be placed.
And as a final feature, you can specify a script which should be called after the VM has successfully booted and the guest OS has initiated it’s network interface. This script will be called with two arguments: the VM name and it’s IP. You can even specify it may only return a valid IPv6 address (i needed this to deploy VMs in an IPv6-only test environment).
The output if run with the help argument (-h):
|
1 2 3 4 5 6 7 8 9 10 11 12 13 14 15 16 17 18 19 20 21 22 23 24 25 26 27 28 29 30 31 32 33 |
philippe@Draken-Korin:~/VMware/vSphere-Python$ ./multi-clone.py -h usage: multi-clone.py [-h] [-6] -b BASENAME [-c COUNT] [-n AMOUNT] [-p POST_SCRIPT] [-r RESOURCE_POOL] -s SERVER -t TEMPLATE -u USERNAME [-v] [-w MAXWAIT] Deploy a template into multiple VM's optional arguments: -h, --help show this help message and exit -6, --six Get IPv6 address for VMs instead of IPv4 -b BASENAME, --basename BASENAME Basename of the newly deployed VMs -c COUNT, --count COUNT Starting count, the name of the first VM deployed will be -, the second will be - (default=1) -n AMOUNT, --number AMOUNT Amount of VMs to deploy (default=1) -p POST_SCRIPT, --post-script POST_SCRIPT Script to be called after each VM is created and booted. Arguments passed: name ip-address -r RESOURCE_POOL, --resource-pool RESOURCE_POOL The resource pool in which the new VMs should reside -s SERVER, --server SERVER The vCenter or ESXi server to connect to -t TEMPLATE, --template TEMPLATE Template to deploy -u USERNAME, --user USERNAME The username with which to connect to the server -v, --verbose Enable verbose output -w MAXWAIT, --wait-max MAXWAIT Maximum amount of seconds to wait when gathering information (default 120) |
To run the script, the command should look something like this:
|
1 |
philippe@Draken-Korin:~/VMware/scripts$ ./multi-clone.py -s vcenter.server.domain.tld -u DOMAIN\\USER -t VM-Template -b Deployed-VM -c 1 -n 10 -r TestRP -p ./post-process.sh -6 -v -w 120 |
And finally, the script itself, you can also download it on Github:
|
1 2 3 4 5 6 7 8 9 10 11 12 13 14 15 16 17 18 19 20 21 22 23 24 25 26 27 28 29 30 31 32 33 34 35 36 37 38 39 40 41 42 43 44 45 46 47 48 49 50 51 52 53 54 55 56 57 58 59 60 61 62 63 64 65 66 67 68 69 70 71 72 73 74 75 76 77 78 79 80 81 82 83 84 85 86 87 88 89 90 91 92 93 94 95 96 97 98 99 100 101 102 103 104 105 106 107 108 109 110 111 112 113 114 115 116 117 118 119 120 121 122 123 124 125 126 127 128 129 130 131 132 133 134 135 136 137 138 139 140 141 142 143 144 145 146 |
#!/usr/bin/python import sys, re, getpass, argparse, subprocess from time import sleep from pysphere import MORTypes, VIServer, VITask, VIProperty, VIMor, VIException from pysphere.vi_virtual_machine import VIVirtualMachine def print_verbose(message): if verbose: print message def find_vm(name): try: vm = con.get_vm_by_name(name) return vm except VIException: return None def find_resource_pool(name): rps = con.get_resource_pools() for mor, path in rps.iteritems(): print_verbose('Parsing RP %s' % path) if re.match('.*%s' % name,path): return mor return None def run_post_script(name,ip): print_verbose('Running post script: %s %s %s' % (post_script,name,ip)) retcode = subprocess.call([post_script,name,ip]) if retcode < 0: print 'ERROR: %s %s %s : Returned a non-zero result' % (post_script,name,ip) sys.exit(1) def find_ip(vm,ipv6=False): net_info = None waitcount = 0 while net_info is None: if waitcount > maxwait: break net_info = vm.get_property('net',False) print_verbose('Waiting 5 seconds ...') waitcount += 5 sleep(5) if net_info: for ip in net_info[0]['ip_addresses']: if ipv6 and re.match('\d{1,4}\:.*',ip) and not re.match('fe83\:.*',ip): print_verbose('IPv6 address found: %s' % ip) return ip elif not ipv6 and re.match('\d{1,3}\.\d{1,3}\.\d{1,3}\.\d{1,3}',ip) and ip != '127.0.0.1': print_verbose('IPv4 address found: %s' % ip) return ip print_verbose('Timeout expired: No IP address found') return None parser = argparse.ArgumentParser(description="Deploy a template into multiple VM's") parser.add_argument('-6', '--six', required=False, help='Get IPv6 address for VMs instead of IPv4', dest='ipv6', action='store_true') parser.add_argument('-b', '--basename', nargs=1, required=True, help='Basename of the newly deployed VMs', dest='basename', type=str) parser.add_argument('-c', '--count', nargs=1, required=False, help='Starting count, the name of the first VM deployed will be <basename>-<count>, the second will be <basename>-<count+1> (default=1)', dest='count', type=int, default=[1]) parser.add_argument('-n', '--number', nargs=1, required=False, help='Amount of VMs to deploy (default=1)', dest='amount', type=int, default=[1]) parser.add_argument('-p', '--post-script', nargs=1, required=False, help='Script to be called after each VM is created and booted. Arguments passed: name ip-address', dest='post_script', type=str) parser.add_argument('-r', '--resource-pool', nargs=1, required=False, help='The resource pool in which the new VMs should reside', dest='resource_pool', type=str) parser.add_argument('-s', '--server', nargs=1, required=True, help='The vCenter or ESXi server to connect to', dest='server', type=str) parser.add_argument('-t', '--template', nargs=1, required=True, help='Template to deploy', dest='template', type=str) parser.add_argument('-u', '--user', nargs=1, required=True, help='The username with which to connect to the server', dest='username', type=str) parser.add_argument('-v', '--verbose', required=False, help='Enable verbose output', dest='verbose', action='store_true') parser.add_argument('-w', '--wait-max', nargs=1, required=False, help='Maximum amount of seconds to wait when gathering information (default 120)', dest='maxwait', type=int, default=[120]) args = parser.parse_args() ipv6 = args.ipv6 amount = args.amount[0] basename = args.basename[0] count = args.count[0] post_script = None if args.post_script: post_script = args.post_script[0] resource_pool = None if args.resource_pool: resource_pool = args.resource_pool[0] server = args.server[0] template = args.template[0] username = args.username[0] verbose = args.verbose maxwait = args.maxwait[0] # Asking Users password for server password=getpass.getpass(prompt='Enter password for vCenter %s for user %s: ' % (server,username)) # Connecting to server print_verbose('Connecting to server %s with username %s' % (server,username)) con = VIServer() con.connect(server,username,password) print_verbose('Connected to server %s' % server) print_verbose('Server type: %s' % con.get_server_type()) print_verbose('API version: %s' % con.get_api_version()) # Verify the template exists print_verbose('Finding template %s' % template) template_vm = find_vm(template) if template_vm is None: print 'ERROR: %s not found' % template sys.exit(1) print_verbose('Template %s found' % template) # Verify the target Resource Pool exists print_verbose('Finding resource pool %s' % resource_pool) resource_pool_mor = find_resource_pool(resource_pool) if resource_pool_mor is None: print 'ERROR: %s not found' % resource_pool sys.exit(1) print_verbose('Resource pool %s found' % resource_pool) # List with VM name elements for post script processing vms_to_ps = [] # Looping through amount that needs to be created for a in range(1,amount+1): print_verbose('================================================================================') vm_name = '%s-%i' % (basename,count) print_verbose('Trying to clone %s to VM %s' % (template,vm_name)) if find_vm(vm_name): print 'ERROR: %s already exists' % vm_name else: clone = template_vm.clone(vm_name, True, None, resource_pool_mor, None, None, False) print_verbose('VM %s created' % vm_name) print_verbose('Booting VM %s' % vm_name) clone.power_on() if post_script: vms_to_ps.append(vm_name) count += 1 # Looping through post scripting if necessary if post_script: for name in vms_to_ps: vm = find_vm(name) if vm: ip = find_ip(vm,ipv6) if ip: run_post_script(name,ip) else: print 'ERROR: No IP found for VM %s, post processing disabled' % name else: print 'ERROR: VM %s not found, post processing disabled' % name # Disconnecting from server con.disconnect() |
The script is probably a work in progress, as there are a lot of possibilities for improvement, if you have any requests feel free to contact me!
This is the first Python script i’ve ever written, so forgive me if i made some basic mistakes against best practices. Feel free to submit a patch.